Socks v1.0
Socks, or, how I learned to not be afraid.
“I don’t bother with socks anymore…” - Mary Benton
She said this during our second knitting class, having shown some of her knitwear collection. She mentioned something about a triangle, which was difficult to get right? So I thought, well I guess socks and sweaters must be the pinnacle of knitting achievement.
I mean, think about it. Up until now, the objects I’ve been working on are all one shape:
- scarf = rectangle
- hat = circle
- pillow = rectangle
- headband = tube
- mittens1 = tube
That’s because the body part you wear them on is essentially one shape. Now take a look at your foot. There’s a bend…which, if you were just interested in covering only the foot part, that’s just a tube again, but formally, socks also include covering your ankle and bits of your leg. So you need to account for that bend. And sure, you can just make an extra long tube and not worry about the shape, but that would mean stitches bunching up where the top of your foot meets your ankle and stretching the stitches on your heel.
I had to confront all of this when finalizing the Christmas Frenzy project list. Boompa wanted socks. So I was to make socks, the second order impacts of human anatomy be damned.
Project Info:
Pattern: Basic 4-ply Socks by Winwick Mum supplemented by Rye sock by Tin Can Knits
Yarn: Textured Twist by Loops & Threads, fall meadow colorway, acrylic and polyester blend, bulky weight
Needles: US 8 DPNs
Misc: persistence
Act 1 of this project was finding a pattern for socks that used bulky weight yarn. Most store manufactured socks are made with pretty lightweight yarn but are also made on smaller needles or double stranded to make a sturdier knit. Bulky yarn is really only seen, I think, in those slipper socks with the grippy bits on the bottom. But, the fact that these socks would function as slippers since my grandma has to wear medical compression socks, this worked out.
Act 2 was confronting something that the knitting community calls Second Sock Syndrome. This occurred with the mittens to a lesser degree, but essentially the idea is that socks are not a singular object - they are a pair. Thus to make socks you have to knit two objects to be finished. The end of the pattern is actually just the halfway point of the project. It’s a bit of a morale killer to realize that upon celebrating the completion of the first sock you must turn around and do it all over again. Thus, persistence. The second sock will come easier since you’ve gained insight from the first sock’s mistakes.
 |
 |
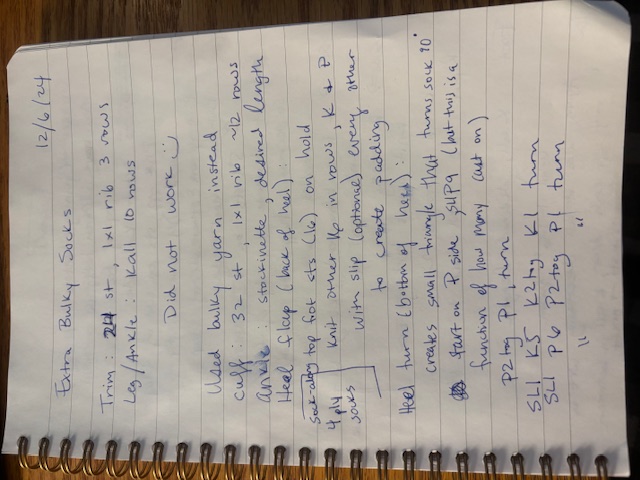
My notes, which are a condensed and mashed together version of the two patterns above.
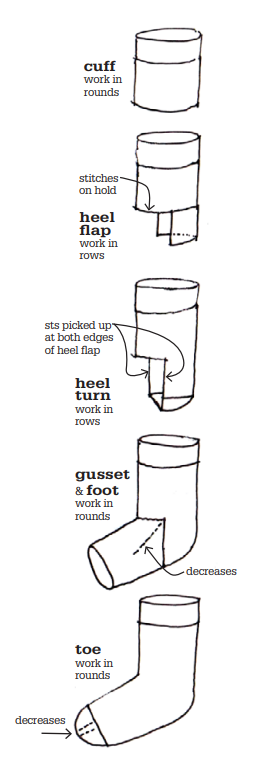
The sock, like the mitten, is knitted from the cuff down. I did a 1x1 rib and switched to stockinette for the leg/ankle portion. I modeled the relative size of the cuff / leg on a pair of slipper socks I have, but there’s a lot of flexibility in terms of how long the socks could be.
The sock part happens when dealing with the heel, which is when we deal with the 90 degree angle going from the leg to the foot. Here, I followed the 4-ply sock pattern, which created the heel in two parts: flap and turn. The flap was worked in rows using half of the stitches (those corresponding to the back/bottom of the sock). The heel is reinforced by alternative knit or purl with slipped stitches, with that extra yarn providing cushion. I measured how long the heel flap should be using my own foot, measuring from ankle bone to the floor, but ideally you would have this measurement for whomever the socks will be for.
The heel turn is set up by the heel flap, and is the driver of the bend that the sock does. Construction wise, the heel turn is a small triangle (alluded to by Mary Benton) that turns the heel flap 90 degrees by working in short rows across the heel flap stitches. The P2tog moves create that triangle shape and rotates the direction the stitches point to. With experience, the pattern is quite clear on how to construct both parts of the heel, but I relied a lot on tutorials and videos like this one by Purl Together.
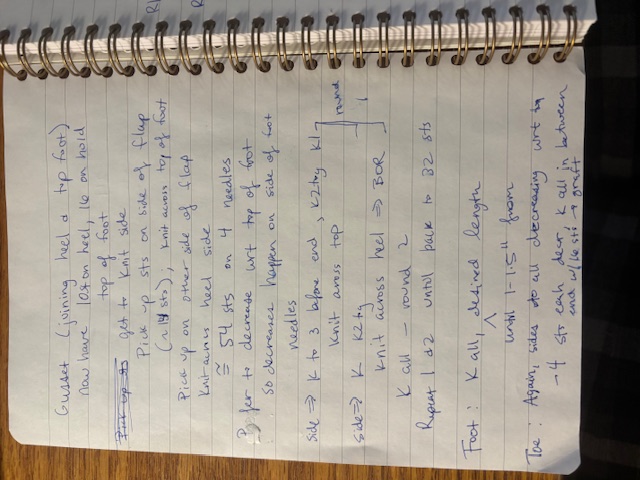
From the heel turn, you now need to join the heel section to the other half of the stitches (that make up the top of the foot) placed on hold. To join, you pick up the stitches on the sides of the heel flap - something that befuddled me for ages because the edges of my heel rows were not as neat as the tutorial, but I found this video by Tin Can Knits extremely helpful. With all of the stitches now joined, you end up with top of foot stitches + heel stitches + side of heel stitches = more stitches than you started with.
To get back to the original number of stitches, we again deal with a gusset, but this time working to decrease the number of stitches. Here, it is very important to pay attention to which stitches belong where (e.g., side/top of foot) because you want the line of decreases to be along your ankle/side of heel. My solution was to use 1 needle for each foot section instead of placing markers everywhere.
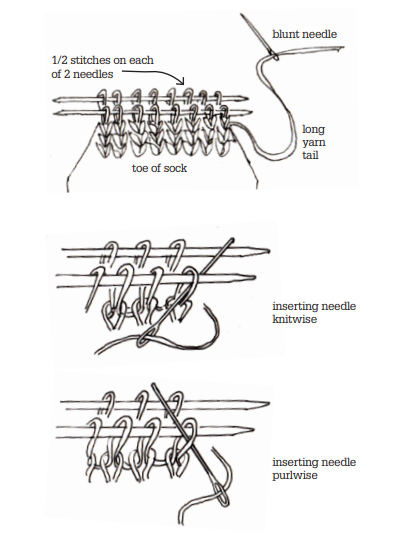
From then, it’s just about making the foot part of the sock to whatever length you want (my family is a family of BigFoots [Bigfeet?] and so these socks ended up being 12 inches from heel to toe), with the toe shape involving a few rounds of decreases to end up with 16 stitches that are then sewn together with a graft stitch. Now this devil of a move was so confusing and I’m sure on the first sock I royally screwed it up. But the idea of the graft stitch is that you’re seamlessly joining the two sides of the yarn tube using a blunt needle to alternately purl and knit the front and back stitches together. For this move I followed the Tin Can Knits guide to grafting which had the most legible illustrations I found (+ the most helpful illustration of sock construction).
 |
 |
Diagrams by Tin Can Knits
Finished one, took a break making another hat, then finished the second sock. They turned out not half bad, given this was probably the most advanced construction I had tackled (not to mention tackling my fear of Big Sock).

Don’t mind the frizziness of the toe, grafting is hard
-
ok this is cheating a bit but really mittens are just two tubes put together with a little gusset to make room for the second tube ↩