Duplicate Stitch
(sort of) cross-stitch + hat = any pattern under the sun
After finished the Sophie Hood (for the second time), I’ll admit I felt a bit fatigued. Cole kept asking “when are you going to jump into sweater knitting???” and I felt more tired and intimidated than ever before. Perhaps my honeymoon period with knitting was over? But after a bit of rest after seemingly nonstop knitting, two things motivated me: the Sophie Hood looked great on and I saw a reddit post mentioning “duplicate stitching.”
In a post on r/knittinghelp (the only reddit page I reliably visit besides the Tampa Bay Lightning and the flagship r/knitting pages), someone was requesting advice on how to replicate a sweater they saw in a movie. The sweater in question featured a sort of colorful grid patterned sweater with vertical and horizontal stripes on a heather gray background. The top comment suggested knitting the horizontal stripes in the round and add the vertical stripes with duplicate stitch after finishing the sweater. Duplicate stitch is typically done as an embroidery effect on stockinette knits, where a contrasting color (or the same color if reinforcing a particularly threadbare section) is stitched on top of an existing stitch and can be a quick and relatively easy way to add color to a piece.
I was intrigued by this technique because I had been looking for a way to knit a Tampa Bay Lightning hat and couldn’t find a pattern to my liking. Suddenly, I could just knit any hat and add the Lightning logo on top. Which led me to a second discovery: Stitch Fiddle, a site where you can create custom knitting charts for any project (it has options for patterned knitting with different stitches and colorwork). For my purpose, I used it to create a colorwork grid from a PNG of the Lightning logo, edited down to match the gauge of the hat I planned to knit this on. With these two concepts (DIY colorwork patterns and duplicate stitch), a whole world of possibility opened up.
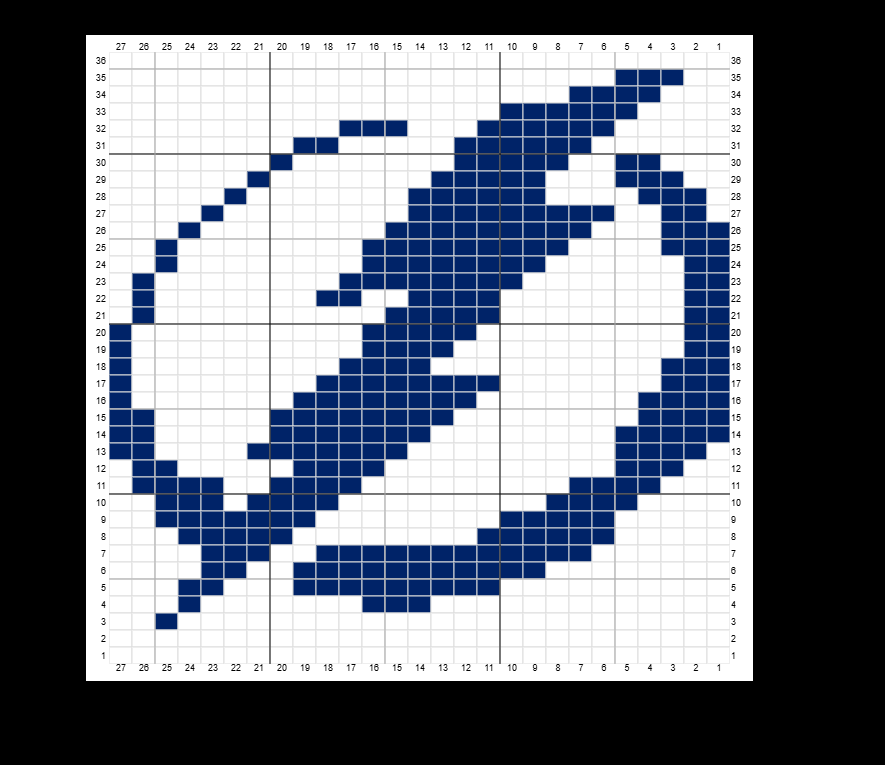
Lightning logo grid pattern on Stitch Fiddle. Edited down to conform to hat gauge, balancing logo size and resolution.
Project Info:
Pattern:
- [Hat base] Fjord Hat by Weichien Chan via Arctic Knits)
- [Lightning Logo] My own! via Stitch Fiddle
Yarn:
- [base] Merino Extra Fine by Drops, black colorway, 100% Merino, DK weight
- [logo] Impeccable by Loops & Threads, sapphire colorway, 100% acrylic, worsted weight
Needles: US 6 circular and DPNs
Misc: needle work
The inspiration and plan for this work was simple: I don’t have a Lightning hat, I learned what duplicate stitch was, and I found stitch fiddle. The hat knit was as simple as can be (by this point I can whip out a half decent hat in a couple of hours) but the real project was getting acquainted with duplicate stitching. It is here I’ll admit: this was not my first rodeo. From similar a similar motive (not having an appropriately themed hat to wear), I had attempted a duplicate stitch a Minnesota Wild hat and learned two lessons from that: 1) the hat needs to be in a gauge that allows the eventual pattern to have relatively decent ‘resolution’ and 2) the yarns used for duplicate stitching need to be of the same weight as the background or bulkier. The first lesson revealed itself when the finished hat (made with bulky acrylic yarn) was only 72 stitches around, which meant that I only had ~35 stitches to work with, and even then if the logo pattern was 35 stitches across, it would take up the entire half of the hat which would look odd. The second lesson revealed itself while working on the pattern. That the base yarn was bulky meant that all of the yarn I used for the logo had to be doubled (or even tripled) up to ensure the base color did not peak through the duplicate stitch. Both of these factors meant the finished hat had a quite large and quite bulky logo that could only be partially discerned from a distance.
So my choice of yarn/hat pattern for this project was intentional. I cast on 120 stitches on size 6 needles, which meant that I’d have ~40-50 stitches to work with when making the pattern. For me, duplicate stitching and the techniques to read/employ the pattern were very similar to cross-stitching, which I have a little bit of experience with. It’s best to work in rows, section-by-section, from bottom to top, due to the way the duplicate stitch is worked (inserted from behind at the bottom of the stitch, through the two ‘legs’ of the stitch above, and back through the bottom of the stitch). I found that this results in the most uniform looking V stitches and by working in sections from bottom to top avoids any unnecessary floats on the inside of the hat.
One bonus with this duplicate stitch technique is that mixing yarn fibers is not so big of an issue. In normal colorwork, you would want to stick with the same fibers throughout to avoid any weird tension issues. But here, since the colorwork yarn is placed on top of an existing stitch, as long as the duplicate stitch is not pulled too taut, the impact on the tension is minimal. Plus, the way the duplicate stitch is worked, there is very little yarn exposed on the inside/back of the piece, so any textural differences between yarns is not noticeable.
This particular pattern was quick to finish, though I learned a final lesson: the size of the piece also impacts how tall the duplicate stitch pattern can be. I worried so much about the horizontal resolution of the logo that I didn’t realize it would extend into the decrease rows of the hat. Thankfully the impact of this (fewer stitches in those rows so the flat logo pattern did not line up properly) is minimal.
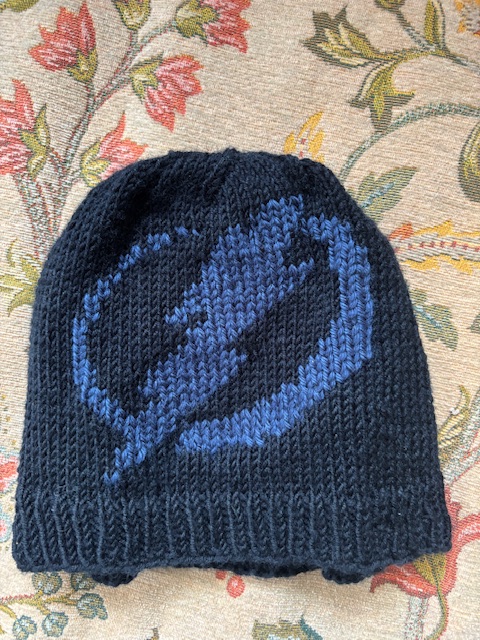
Finished the Tampa Bay Lightning hat just in time for the 2025 Stanley Cup playoffs. I ended up posting this work for the public (for the first time) to the knitting and Lightning reddit pages. People were very receptive so I’m pretty proud of the work. Here’s to hoping for many hatties along the way.